FITTING OUT
APPUSKIDU
Outside –
Part 2
Petrol Tank Stowage
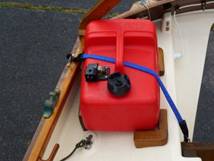
Having sealed
the lazarette I tried various ways to eliminate petrol fumes building up
inside. I even made a tank fitting to vent the tank into the cockpit through a
secondary hose to an outlet high at the back of the cockpit with a gas valve in
the line to seal the vent line when trailing. Nothing however, would completely
stop fumes building up in the lazarette. I don’t know where the fumes came from
since the vent on the tank cap remained shut and the seals on the tank and the
hoses were all in good condition. I tried replacing the tank but it made no
difference. Nothing for it then but to mount the tank on the
deck.


From teak
offcuts I made two chocks for the outboard side in order to keep the tank
level. The forward chock also has an upstand to locate the outboard side of the
tank. Two ‘L’ shaped chocks both locate the inboard side of the tank and
restrain fore and aft movement. The chocks are secured to the deck using the
kind of silicone that is used to glue aquariums together. To keep the tank
firmly in its chocks a stout elastic strap runs from the starboard engine mount
eye bolt over the tank to a stout deck eye screwed to
the gunwale.
This has also
meant moving the starboard aft fairlead forward a bit so that mooring lines clear
the tank. The boarding step stowage has also had to be moved to the port side.
Dehydration avoidance

It is easy to
get dehydrated on a hot, or even just windy, day. However, there is nowhere
convenient in the cockpit to keep a bottle of water handy. My answer has been
to fit a bicycle water bottle in the front corner of the cockpit. The location
shown in the picture has so far proved to be immune from snagging on ropes or
crew. The bicycle bottle cage keeps the water handy and prevents the bottle
from rolling about. The only downside is that in this exposed position the
water can get quite warm in hot sun.
Taming the furling
line

One of the
bugbears of our simple jib furling gear is the possibility of the line jumping
off the drum and jamming under it. This often happens at inconvenient moments and
the necessity to visit to the foredeck to clear the jam is particularly
unwelcome to the single handed sailor. It is less
likely to occur if the furling line has some tension so that there is no
surplus line to get foul on the drum, particularly when the jib is slatting
about in light airs.
I know of no
absolute cure apart from replacing the furling mechanism with an endless line
or an enclosed drum alternative. However, I have found an aid. This little
Spinlock dinghy clutch makes it so easy to jam the furling line after letting
the jib out that there is no excuse for not keeping a little tension in the
line. It is more expensive than a plastic cleat but has proved a real boon to
this single handed sailor as I don’t have to stop and
cleat off the line with everything else that I am doing when setting off. Just
hold the line outboard and give a little tug.
The Spinlock dinghy
clutch is still not totally positive when the line is slack and this cheaper Clamcleat
combo should work better. Accordingly I have now fitted this set up but have not
yet tested it (although it works fine on the mizzen topping lift/brailing line).


The Clamcleat
CL 203 Junior cleat at left above is transformed by adding a CL 814 “Keeper” at
right which slips over the cleat and holds a slack line until you pull it up
and out. In theory it will even hold a slack line if the cleat is upside down!
If only they made a keeper for their range of larger cleats then they would be
great for the jib sheets. Many chandleries stock the cleat but not the keeper
which is easiest to find on line.
Telescopic mast crutch


Raising the
mast upright whilst standing on the foredeck is difficult because the mast
crutch that is fitted in lieu of the mizzen mast to
support the top of the main mast for trailing is designed to support the mast
lying horizontally not to help you raise the mast. Even if you raise your arms
when pulling on the forestay from the bow much of your effort is spent trying
to compress the mast because of the shallow angle. Drascombers with a crew will
ask the crew to stand aft and hold the mast top as high as they can. However, a
mast crutch that will extend and so support the mast at a much steeper angle
will substitute as crew for us single handed souls and
has long been a goal. I tried attaching a hinged extension on the crutch. If it
hinged forward it fouled the tiller and if it hinged aft it fouled the outboard
and as a result it had to be so short as to be useless. The crutch therefore
had to be telescopic. Inspiration came from a beautiful hand made music stand
from which I copied the telescoping mechanism.


The inside
post is made from a single piece with a slot routed through it from near the
top to near the bottom. The inside post slides inside an outer post made from
two pieces each having a channel routed into it to fit around the inner post.
The slot in the inner post accommodates the clamping screw that passes through
it and allows the post to rise and fall when it is slackened. To make the
clamp, having no lathe to make a wooden thread, I took a cheap beech wooden
knob from a DIY supermarket and drilled and counterbored it so that the head of
a 10mm stainless steel bolt passing through it would be concealed. The bolt
head was drawn into the undersize counterbore to prevent the bolt from turning
in the knob. Putting a matching plug in the hole completed the task of making a
screw with the appearance of a wooden head. A second drilled knob this time with a
nut drawn into its undersize counterbore effectively made a wooden nut. The nut
and bolt operated by the wooden knobs clamps the assembly in the raised
position. Extra length is gained by the travel of the inner post reaching well
below the rudder capping/upper mizzen support. At the top of the inner post is
a leathered yoke to hold the mast. I do not have the popular ‘bunny ears’
arrangement as that would interfere with my overall boat cover.
Yard


When sailing
under jib and mizzen with the gunter yard lashed
against the mast and the mainsail parcelled at the heel of the mast, the jib
sheet has a nasty habit of fouling on the metal prongs of the pitch fork of the
gunter jaws when going about. If the yard is raised a little this tendency
reduces but I noticed that the problem was less pronounced on my Mk1 Lugger. I have never been a
great fan of the pitch fork gunter jaws anyway so I have replaced them with Mk1 style wooden
jaws. You will notice that the jaws are leathered for kindness to the mast. I
also leather the yard above the halliard attachment hole. This protects the
yard from the stainless steel masthead fitting when the yard is hard against
the mast as it should be.
Oars

My oars are
10ft ones as I sometimes like to row for exercise and sometimes to traverse
extreme shallows. The 8ft ones will move you but I do not find them comfortable
for rowing any distance. My oars stow on the side deck with the handles at the
bow and the blades butted against my side deck breakwaters. A short bungee
through a hole in the end of the oar blade and the drain hole in the breakwater
stops the oars from going AWOL from their stowage in heavy weather. An anti
theft cable could be threaded in the same way.
My oars (which
were made by an East Coast based ex Olympic oarsman who was a previous owner of
a Drascombe Longboat) came with a whipping of terylene
twine instead of leathering. This whipping has stood the test of time and worn
much better than leather. To give the oars an effective set of collars at the
inboard end of the whipping I applied a turk’s head of
8mm braid. This looks the business as well as helping an inexpert oarsman like
me keep the oars in the right place. I found the Internet a very useful source
of lessons on how to make a turk’s head.
I row with the
tiller taming line in place to keep the tiller where I put it and I carry a
little wedge that goes under the heel of the tiller to lift it and stop my
hands from hitting the front of the tiller as I push the oar handles away from
me on the recover.
Steering oar

Needing a 12ft
oar for steering on a trip to a Dutch Drascombe rally on the shallow waters of
the Waddensee I looked around and found the handle end of a broken oar in my
garage. This had been relegated to duty as a rounders bat but would make a
suitable oar extension if I could make a connecting piece. I had some narrow drain pipe of the kind used for sheds. Knowing that
sloppiness is the enemy of any tubular extension, using plumber’s solvent
adhesive I built up layers of pipe around the reduced diameter of the handle of
my oar then built over that a tube that would fit over the shafts of the oar
and the extension.

As the oar
shafts are larger than the diameter of the drain pipe, my tube is made of three
overlapping pieces each slit longitudinally and solvent welded together. The
end that fits on the extension is permanently bolted on. The end that fits on
the oar that was designated as steering oar was also intended to be bolted on
with wing nuts, but temporarily as required. In the event that proved
unnecessary. It is such a snug fit the difficulty is in getting it apart. Not
holding it together.
To protect the
oar when it is being used to steer I have added a second whipping where the
sculling rowlock bears.


Because of the
length of the aft deck of a Drascombe, steering with a 12ft oar is much easier
than with a shorter one. The Dutch Drascombers tend to have a dedicated 12ft
(or even longer) oar ready to hand either tied to the shrouds or mounted
against the front of the mizzen mast like this.
The latter
arrangement appeals to me more. The art of steering by sculling oar in shallow
waters however, still requires a little practice and
it has to be accepted that the oar will contact the mizzen mast if sharp turns to
starboard are attempted.
Anchors


Following the
occasion when my Danforth failed to hold off Ryde due to gravel caught between
the flukes and the occasion when I could not find ground where either the
Danforth or my CQR kedge would hold amongst the weed and rocks of Caladh I
resolved to try a modern anchor.
The ‘Spade’
seemed best but the pricing rendered it an extravagance so I bought a 6Kg
‘Delta’ to try instead. It hangs on the end of the original 10 metres of 6mm
chain and 35 metres of 10mm multiplait nylon. It is secured to one side of the
foredeck, as the Danforth was, so as to leave the central cleat free for
mooring lines. It is the biggest anchor that I can comfortably handle on the
little foredeck and it has not yet let me down. I would not suggest that
harbour sailors need to trade up from their more easily handled Danforth as the
Delta is really designed to hang over the bow on an extended bow fitting.
However, it does offer a bit more confidence for folk who travel as widely as
I. The new kedge, which doubles as a rock hook, is a 5Kg folding fisherman with
wide flukes. It lives folded up with its 5 metres of 6m chain and 25 metres of
three strand 10mm nylon warp in a compact bag on the cockpit floor under the
bunk infill where its weight does the most good.


There are
times when you want to anchor to the shore – usually when navigating rivers,
particularly non tidal ones. My solution to this is
the helical ground screw device that is sold to anchor dogs to the lawn.

It is stored
inside another item that is used for anchoring – a piece of drainpipe that has
a slot cut in it so that it can fit over and protect the cockpit gunwale from
the chain when it is necessary to use the jib winch to recover the anchor. For
example when the when the pull from strong winds had caused the Danforth to
bury itself so deep in the mud of Fowey harbour that I thought it was never
going to come out.
Electric Water

My fresh water
lives in two 10 litre plastic jerrycans in the lazarette. I used to decant
water from these into a 3 litre bottle for easier use
when filling the kettle and the washing up bowl etc. As I find funnels
unhygienic, the decanting process was a major cause of wastage with 5% to 10%
of the water ending up over the side. This prompted an experiment with pumped
water. The assembly starts with a length of drinking water grade reinforced
plastic hose. At the suction end this is fitted to a little cylindrical whale
submersible pump. The wire for the pump is taped to the hose and the pump end
is lowered into one of the plastic jerrycans. A blue plastic collar (from a
caravan store) fits over the hose and acts as a closure for the water container
as the lid has been removed to accommodate the hose. This closure is a loose
fit and is not watertight but it prevents dust and debris falling into the
water container. At the delivery end, instead of a tap, is a garden hose spray
gun with trigger. This was modified so that it would not spray but only supply
a strong flow of water. The spray gun was then soaked in water purifier. Rather
than fork out for a pressure switch and surge damper just for the experiment, I
mounted a tilt switch on a piece of plastic angle just below the ‘tap’. Tilt
the ‘tap’ down to direct the flow into the kettle, bowl or what have you and
that will switch the pump on. The flow is then started and regulated by the
trigger. Tilting the ‘tap’ back up to horizontal switches the
pump off again. So far it has worked quite well and now that the petrol
tank has been removed to the deck I shall be able to put a dedicated socket in
the lazarette for the water pump instead of having to use the tiller pilot
socket. Then a pressure switch perhaps . . . .
Gunwale finish

Apart from the
washboards which, like the spars, were varnished, the hardwood on Appuskidu was
treated when new with Burgess hydrosol marine wood
sealer. This lasted well on the interior surfaces like the centreplate capping
and on the floorboards of both the cabin and the cockpit. However, on the
gunwales, it flaked and left an unsightly finish as may be seen from the
earlier pictures on this site. As this was purely a cosmetic issue it took a
long time for it to come to the top of the jobs list. Eventually though, the time
came and I scraped the remaining Burgess off as it was obviously an unsuitable
base for a simply putting more Burgess on top without stripping. But having
removed it what should I replace it with? A new Burgess
treatment? Deks Olje? Or something else?
A prime
consideration was that the surface should be non slip
as it is necessary to walk on the gunwales when going forward at sea. That
meant that a varnish system was out of the question. I was very pleased with
the Deks Olje system that I had on the transom but it only lasted well if it
was finished with Deks Olje 2 which leaves a glossy finish. Acceptable
on the transom but not on the gunwales. Teak oil was out as experience
on Appuski Dusky had shown that it required regular maintenance and as a natural
finish would eventually be blackened by mildew. Timber treatments intended for
sheds and fences are used by some Drascombers who keep their boats afloat with
uncovered woodwork. For these owners appearance is secondary to low
maintenance. Appuskidu is kept covered ashore when not in use so I should not
need to go to those extremes.
I had heard
good reports of a product called Cetol Marine from Sikkens so I decided to give
it a try. I was advised to use the ‘Natural’ colour as the colours came out too
dark. It went on easily and gave a good appearance when dry. It is also lasting
well. However, there was a snag – it is slippery when wet. I have addressed
this with self adhesive strips of non slip tape on the
areas where I walk. Fortunately these are not unsightly although having to
apply them was a disappointment. Overall Appuskidu now looks rather smart.
Gunwale protection
High mileage
trailing causes the trailer tie down straps to wear the edge of the gunwale so
whilst I had the half round section brass rubbing strip for the keel, (see
trailer/rollers page) I cut off a couple of short lengths. I rounded the ends
of the strips, drilled and countersunk them for screws, and then polished them.
These short strips of brass were then screwed to the top outside edge of the
gunwales where the trailer tie down straps bear. They look smart and reduce the
wear on the gunwales caused by the straps.