Boat Covers
I have learnt
many lessons about boat covers over the years. Here are some of those lessons.
It won’t keep
the rain off unless it has a “fall”. If there is anywhere a puddle can form -
it will and the cover will fail.
It won’t keep
the sun and UV off the sides of the boat unless the cover comes down to the
waterline.
It won’t keep
the weather from rusting the trailer winch and UV from rotting the winch strap
unless they also are covered.
It won’t keep
the boat clean when towing unless the cover is on the boat. How mucky does your
car get when it rains?
If you tow
with the cover on as I do, then the cover has to be tight – using rope, not
elastic, tie downs.
It won’t
prevent mildew, in the winter in particular, unless adequate ventilation is
provided.
Boat covers
don’t last as long as boats so you have to get used to replacing them from time
to time.
Making your
own cover is not rocket science. See below.
Winter Covers


This is Brad’s
winter cover for Siobhan and my winter cover for Appuskidu. As you will see,
the general layout is similar with the mast used as a ridge pole. Siobhan’s
mast appears higher at the back because my mast crutch is as short as I could
make it and still not have the mast crush the folded spray hood on top of the
cabin. This was to minimise the towing height for pricing on Baltic ferries.
Siobhan’s cover is very nicely made with supporting athwartships
hoops and is secured around the gunwales with a strap that is buckled at the
stern. Separate covers for the winch and the spare wheel are evident. Appuskidu’s is basically a large sheet of plastic wrapped
around the boat and the winch. Appuskidu’s spare
wheel lives at home and travels in the car. Siobhan is a wooden Longboat
Cruiser so if UV makes the topsides chalky, another coat of paint can be
applied. There is a limit to the number of times gel coat can be cut back so Appuskidu’s GRP sides are protected from the winter
daylight to help keep her shiny. Both outfits would probably benefit from
covers over the road wheels to prolong the life of the tyres and wheel clamps.
Both covers
have ventilators. You can see a ventilator above Siobhan’s bow. These kind of ventilators are usually sewn into a seam since less
fabric is required below the opening than over the ventilator. In the case of Appuskidu’s plastic winter cover they are taped into place
with 50mm insulation tape after sewing in some old net curtain to keep birds,
bats and bugs out. Since these pictures were taken, a couple of short lengths
of drain pipe, each with a net curtain protected end, have been inserted at the
bow of Appuskidu’s cover for additional ventilation.
The opening for the outboard motor gives some ventilation at the stern. Taking
the cushions home for the winter is a good plan but in a damp atmosphere mildew
will discolour all sorts of things with a preference for organic materials –
even teak oil on gunwales.


When I had the
Lugger Appuski Dusky, I could only afford a black plastic cover which served
for summer, winter and towing. It was
made from 1000 gauge polythene sheet from a local branch of
Transatlantic Plastics (since closed) and tailored (much better than Appuskidu’s winter lash up) using the 50mm wide repair tape
which was sold for the polythene boat covers which at that time were available
commercially from Lakeland Plastics. Keeping the cover intact through the
season required great quantities of tape and I no longer use polythene for the
summer. For the winter cover I now have to use builders
damp proof membrane for the sheeting and 50mm insulation tape for tailoring. I
have discovered no tape that is readily available which has a good long lasting
adhesive. Gaffer/Duct tape is handy for temporary repairs but is particularly
poor when exposed to the weather for long periods. For this reason I use the
minimum of tape and where I have had to gather up the polythene, as at the
stern for example, I simply used plastic eyelets to hold things together. They
double up as tie down points. Why do I have a separate winter cover? To prolong
the life of the summer one which is made from more expensive material with a
lot more work in it and so that ventilation can be added to the winter cover
which would be a nuisance on the summer one.


Polytarp

Another
economy material for boat covers is polytarp. Appuskidu’s first Summer cover was made from white polytarp (At the time of writing you can only get blue or
green in the 200gram weight that was used here – what Bradshaws/Tarpaulins
Direct calls “TopGrade”) As you see from the picture
(which was taken at Newcastle on the way to St Petersburg) it made a neatly
sewn tailored cover. That was contrary to advice from Bradshaws
who said that it couldn’t be sewn. It was an inexpensive way to make a
prototype all over towing cover. Ultimately however, high road mileage brought
an end to this cover after three years. Although it was tailored, the rippling
movements when towing caused it to delaminate in places and it lost its
waterproof characteristics. My conclusion is that it is an inexpensive material
which with care can be sewn but which is not suitable for high mileage towing.
Discussions on forums regarding the use of this material for sails come to the
conclusion that whilst great for prototypes, it has a limited life in that
application also.
The minimum?

This picture
illustrates the “super scrimper” solution for keeping
the sun and some of the rain off the winch.
Professional Covers

This very neat
Coaster cover, spotted at a distance at Den Oever in
the
Appuskidu’s summer cover and DIY construction
If your
vehicle has a permitted maximum gross train mass of less than 3500 Kilos then
in


This is Appuskidu’s latest summer cover and below is a brief
summary of its construction. You will see that it extends to the water line, is
very tightly tailored and has a “cod piece” at the bow to cover the winch and
winch strap. The dark coloured rectangle at the bow is a “target” to help line
up when reversing the car to the trailer.


The fabric
chosen for the job is called “Odyssey”. It is an impregnation coated 100%
polyester which is waterproof, strong and light. A heavy weight fabric such as
PVC or “Top Gun” would be durable but too heavy for me to throw over the
Coaster on its trailer and impossible to sew multiple thicknesses on a domestic
sewing machine. I chose “Odyssey” for my cockpit tent and that has survived a
number of violent storms and extensive use over nine years so far without need
for any repair. This gave me the confidence to select it for the boat cover.
Any good boat cover material is not cheap and unless you can buy from a
distributor as I did, the cheapest source is currently EBay. As I wanted to
protect the sides of the boat I needed to start by sewing three lengths
together side by side to gain the necessary width. The pictures show the fabric
(much longer than the room) laid out on the lounge
floor, and at right, the dining room table augmented by a picnic table and the
ironing board in order to make the largest possible sewing surface.


When handling
such a large amount of fabric a certain amount of planning is required for each
seam. Here you will see a full width of the fabric rolled in the throat of the
machine whilst it is being joined to the next width. The machine appears to be
an Australian copy of a 1960’s Frister Rossman domestic machine. It fitted the following
requirements -
Essential
requirements: Electric; Reliable; Simple; Cheap; Strong; Adjustable bottom
tension; Forward & Reverse; Not my wife’s machine.
Desirable
requirements: Slightly larger throat than modern plastic computerised machines;
Adjustable Stitch length; Has Zig Zag
stitch so can be used for sail repairs too.
Stout
polyester thread will serve but I chose to use cotton covered polyester which
when damp will swell. I could only get it in a big spool which explains the big
spool and bent coat hanger feeding arm which you may be able to see behind the
machine.


After sewing
the three lengths together the next job was to throw the fabric over the boat,
trim off some of the excess and mark where the edges needed to be. I used big
fold back paper clips to mock up the hems.

All the hems,
seams and darts were double sewn with the open edge facing aft. Although deep
hems were made, all eyelet positions were further reinforced as were likely
points of stress such as the bow or places of likely friction such as where the
cover passed over the jib furling drum and over the heel of the mast at the
tabernacle. Vertical darts were added from the gunwale to the hem as required
to tailor the cover tightly to the hull. Horizontal darts were added along the
seams running aft from the back of the cabin. These take up the slack due to
the shorter distance from ridge to gunwale over the cockpit area.
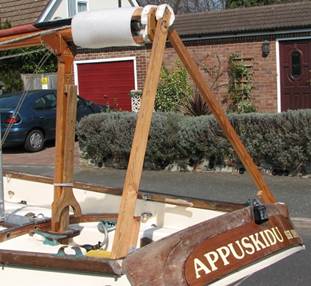

I use an “A”
frame at the stern. This allows me to draw the fabric tight longitudinally. All
the tie downs are rope. Those at the sides are terylene and go under the boat from hem to hem. They
are not tied to the trailer so that the wind created by towing cannot get under
the cover. Those at the stern are white polypropylene which is used for its non
slip properties.
Appuski Too's cover
The first job after
aquiring the Drifter 22 was to make a boat cover.
When not afloat, Appuski Too spent her early years indoors and I don't have
that luxury. I won't go into detail about the construction as it was largely a
repeat of the job of making Appuskidu's cover. The only differences being the greater size, an aft facing "A"
frame, the need to deal with the bowsprit and making a separate cover for the
rudder.


These pictures
show the summer cover being made. Her winter cover is a large untailored polytarp.


The shoe
served until I lined inside the front of the cover with a leather chafing patch
to protect it from the fittings at the end of the sprit. The fourth picture
shows the boat in her finished cover sitting on stillages
borrowed from Churchouse whilst the trailer was being serviced.